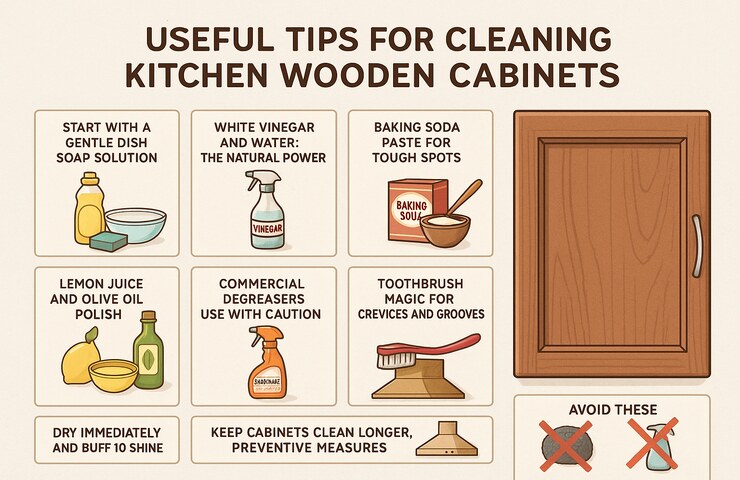
Useful Tips for Cleaning Kitchen Wooden Cabinets
Did you ever notice that sticky, tacky gunk when you ran your hand across your kitchen cabinet? You sweep every day, wipe down the counters, and even clean the appliances, but your cabinets? They are often the forgotten victims of daily cooking. Cooking fumes grease works its way onto the surfaces of wood cabinets over time, mixing with dust to create that difficult, sticky film that you may not recognise until your hand gets stuck to the handle! Does that ring a bell? You’re not the only one, so don’t panic. Wood cabinets are beautiful but fragile and must be cleaned with a delicate dance of strength versus mercy. You’ve come to the right place if you’re asking yourself how to degrease them without harming the wood or stripping the finish. We’ll share some practical, safe, and extremely effective tips on how to achieve that sleek cabinet appearance.
1. Start with a Gentle Dish Soap Solution
Occasionally, simple is stylish, as per Bond Cleaning Sunshine Coast. Dish cleaner is designed to cut grease and is safe for most surfaces, including sealed wood. Mix many drops of a grease-fighting dishwashing liquid( like Dawn) into a coliseum of warm water. Dip a soft cloth or sponge into the result, wring it out well, and wipe the press shells, following the direction of the wood grain. This system works well for light to moderate grease buildup.
Tip: Wash your cloth frequently and dry the wood with a clean, dry microfiber cloth afterwards to avoid water damage.
2. White Vinegar and Water: The Natural Power Pair
White vinegar is an age-old household cleanser that works wonders on grease. Mix equal parts of white vinegar and warm water in a spray bottle. Smoothly wash it on the greasy area and let it sit for 2- 3 minutes to break down the smut. Also, use a microfiber cloth to gently wipe it down. The acetic acid in vinegar cuts through the grease without damaging the wood.
Important: Always test on a retired spot first to make sure it doesn’t affect your press finish.
3. Baking Soda Paste for Tough Spots
Still, stubborn grease stains, incinerating soda is your idol, If you’re dealing with old. Mix baking soda with a small quantity of water to form a thick paste. Apply it directly to slithery spots using a soft cloth or sponge, and gently rub in indirect movements. Let it sit for many minutes before wiping off with a clean, damp cloth.
Why it works: Baking soda is mildly abrasive, so it lifts grease without scratching wood, just don’t drop it too hard.
4. Lemon Juice and Olive Oil Polish
Want to clean and condition your closets at the same time? Try a manual lemon- oil painting polish. Mix two parts of olive oil painting with one part lemon juice. Dab a small quantity onto a cloth and rub it into the wood. Not only does this lift off mild grease, but it also leaves your closets clean and fresh-smelling.
Perk The lemon acts as a natural degreaser, and the oil painting helps nourish the wood, keeping it from drying out.
5. Commercial Degreasers Use With Caution
Still, a store-bought degreaser might be necessary if DIY styles don’t cut it. Look for products specifically designed for kitchen closets or wood-safe cleansers. Brands like Krud Kutter or Goo Gone Kitchen Degreaser are effective on heavy grease buildup but won’t harm your press finish when used as directed.
Safety tip: Always follow the manufacturer’s instructions and wear gloves if required. Avoid anything with bleach or ammonia on wood shells.
6. Toothbrush Magic for Crevices and Grooves
Closets frequently have trim, bevels, and grooves where grease builds up unnoticed. For those tight spots, use an old toothbrush dipped in your cleaning result( dish cleaner or vinegar blend works great). Gently drop in the direction of the wood grain to lift smut without damaging the detailing.
Tip: Use a soft-bristled toothbrush to avoid scratching ornamental shells.
7. Dry Immediately and Buff to Shine
Moisture is wood’s adversary. After every cleaning session, be sure to completely dry your closets using a soft microfiber cloth. For a final touch, buff the face with a dry cloth to restore shine and remove any leftover stripes.
redundant hack For added lustre, apply a dab of wood polish or cabinetwork wax after drying to cover the face from unborn grease.
8. Keep Cabinets Clean Longer, Preventive Measures
Prevention is a stylish conservation strategy. Install range hoods or use lids while cooking to reduce grease in the air. Wipe closets regularly with a damp microfiber cloth to keep smut from accumulating. You can indeed apply a thin fleece of cabinetwork wax every many months to produce a hedge against dirt and oil painting.
Pro tip: Line the top of your closets with paper or shelf liners. That space collects a surprising quantum of grease and dust, and it’s much easier to replace paper than drop wood!
9. Avoid These Common Mistakes
When cleaning rustic closets, don’t use abrasive pads, sword hair, or harsh chemicals. These can scratch the face or strip the wood’s finish. Also, avoid soaking your closets with water humidity can underpin the wood or cause swelling over time.
Stick with Gentle cloths, wood-safe results, and indirect movements. Tolerance pays off with long-lasting shine!
Final Thoughts: Restore the Warmth of Your Wooden Kitchen
Your wooden cabinets earn a little TLC to keep them looking warm, rich, and grease-free. From vinegar sprays and incinerating soda diminutives to lemon-oil polishes, these practical hacks use simple, safe constituents you likely have at home. With harmonious care and the right ways, you can keep those beautiful wood grains shining and your kitchen feeling fresh. So the next time your closets feel sticky, don’t stress, just grab your cleaning toolkit and get to work the smart, gentle way!